Client Profile Management
Introduction
Welcome to Cleaning Companion Client Profile Management Guide, a simple yet powerful tool designed to help you store clients' data effectively.
This guide will walk you through creating your first client profile, deleting, exporting, importing clients' information, adding notes to a client's profile and more.
Use the mini navigation below to move between different parts of this guide.
On this Page
Introduction Overview Create a Client Profile See Client Profile details Importing Clients into your Dashboard Exporting Clients from your Dashboard Edit Client Profile Adding Notes to a Client Profile Reading Added Notes on a Client profile Deleting a Client Profile from your Dashboard Deleting Multiple Clients profileOverview
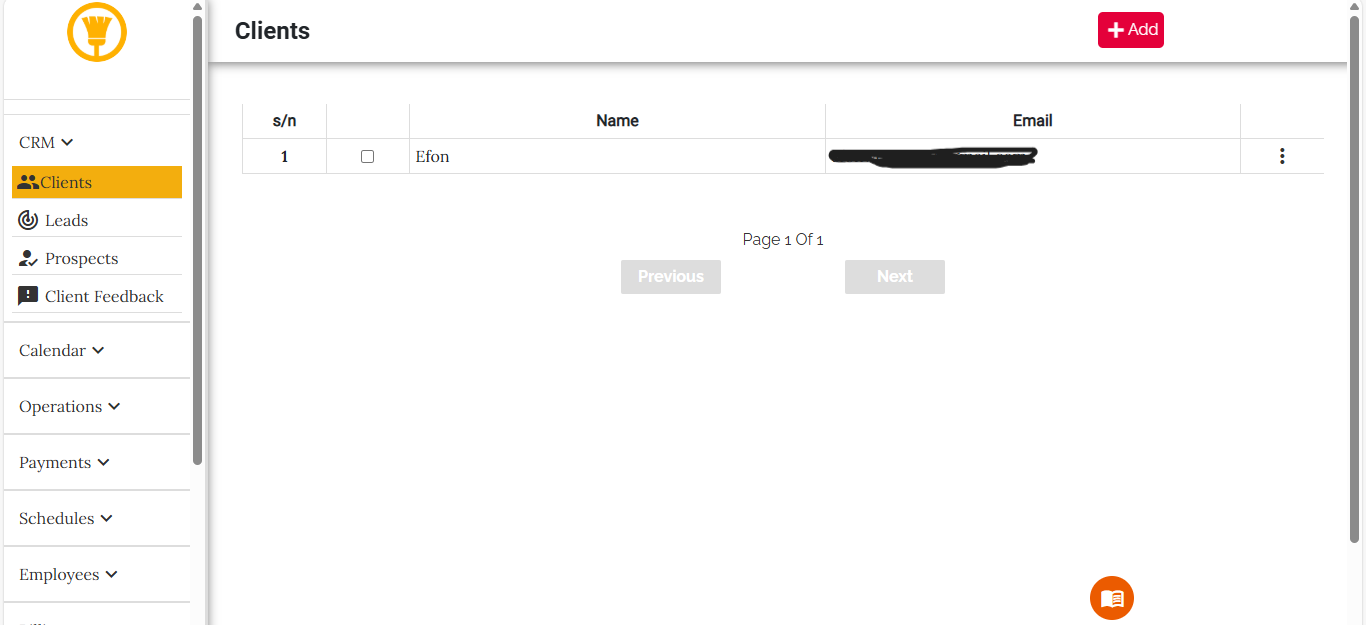
This section provides an overview of how our Client Management Tool webpage looks. The layout remains the same on mobile devices. Click on the image below to view a larger version.
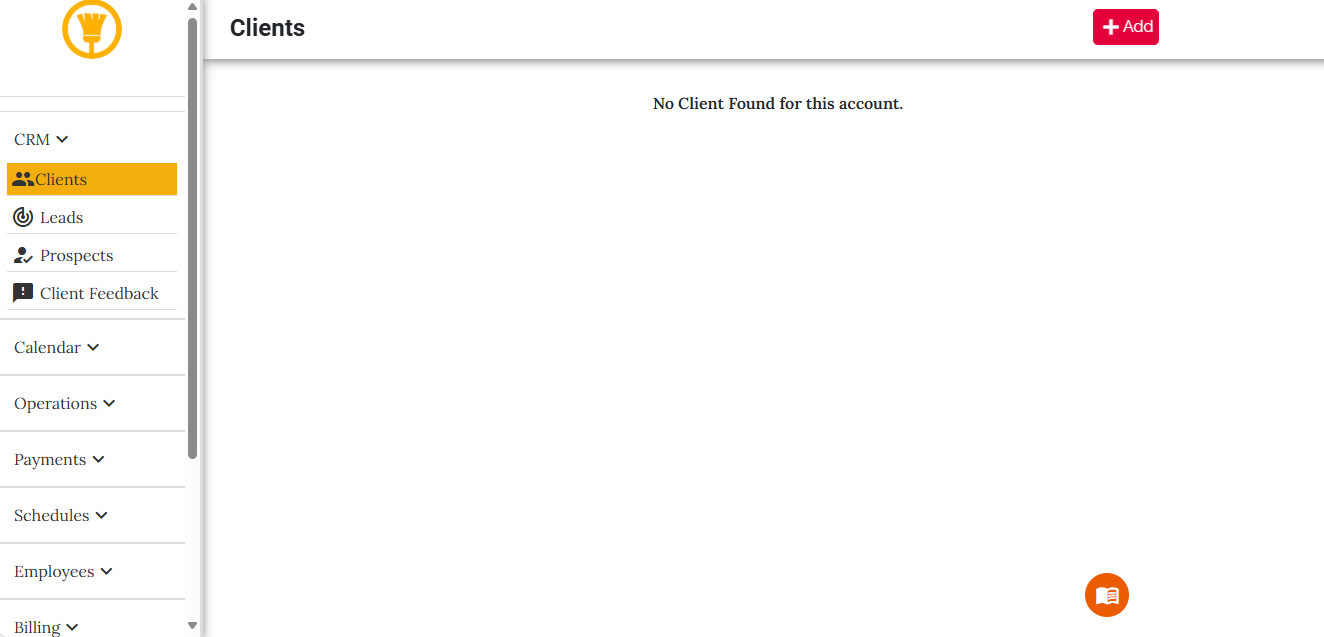
As shown above, the Client Tool tab is a submenu under the CRM tab. It can be accessed by clicking on the dropdown icon next to the CRM tab.
When on the Client page, the tab is highlighted with a distinct color, as seen in the image above, making it easy to identify the webpage you are in. Additionally, there is a large header positioned at the top left corner of the page. The header title corresponds to the current page, providing clear context to users.
Creating a Client
This section guides you through the process of creating a Client Profile.
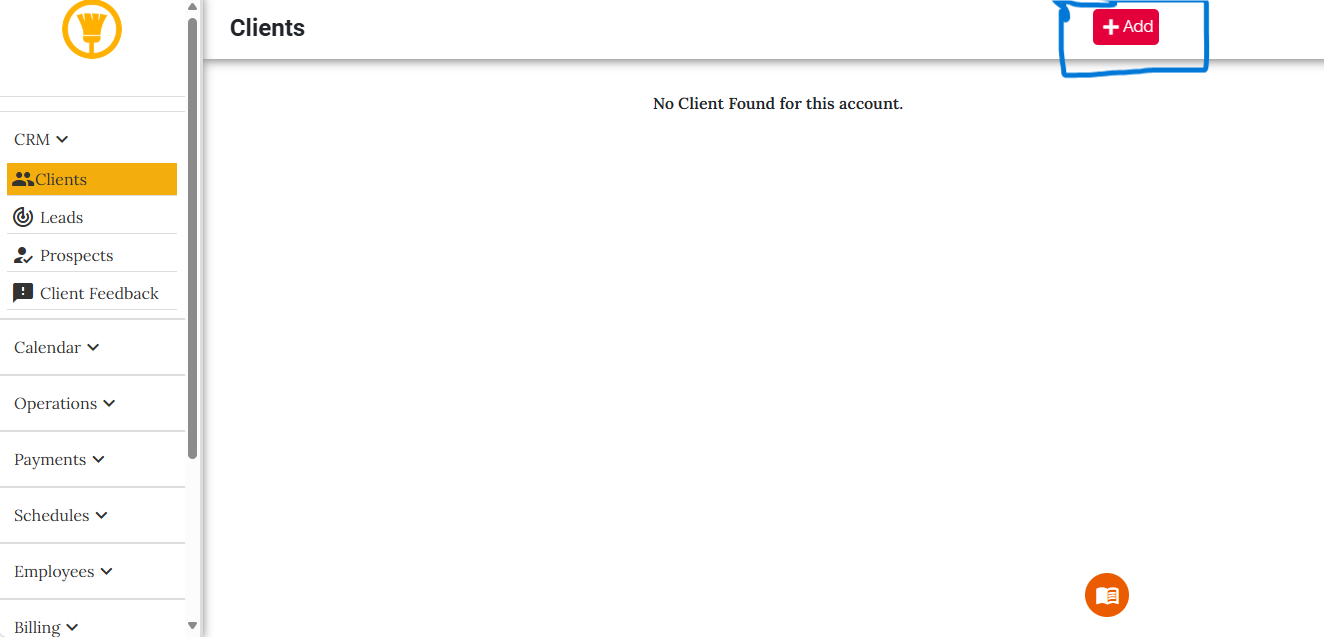
Step 1: Locate the Add Button
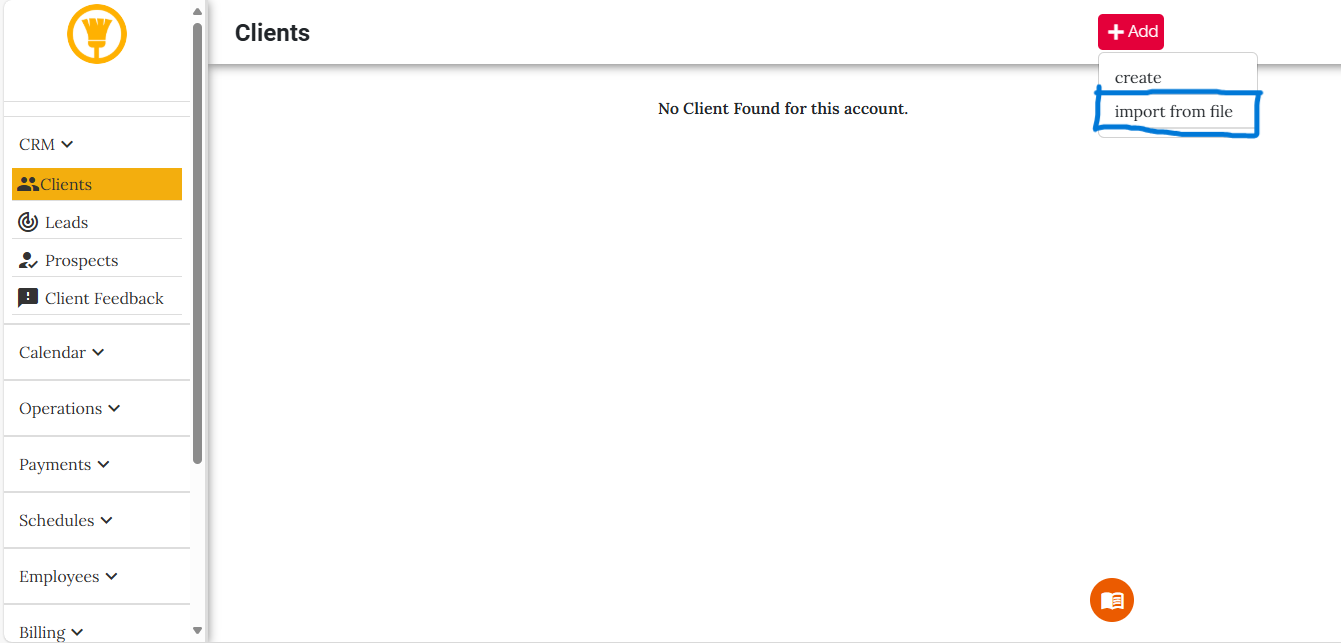
To start creating a Client, locate the Add button at the top of the webpage. (Refer to the image below for the location of the Add button.)
Step 2: Open the Overlay Menu
Clicking on the Add button will display an overlay menu with two options (refer to the image below):
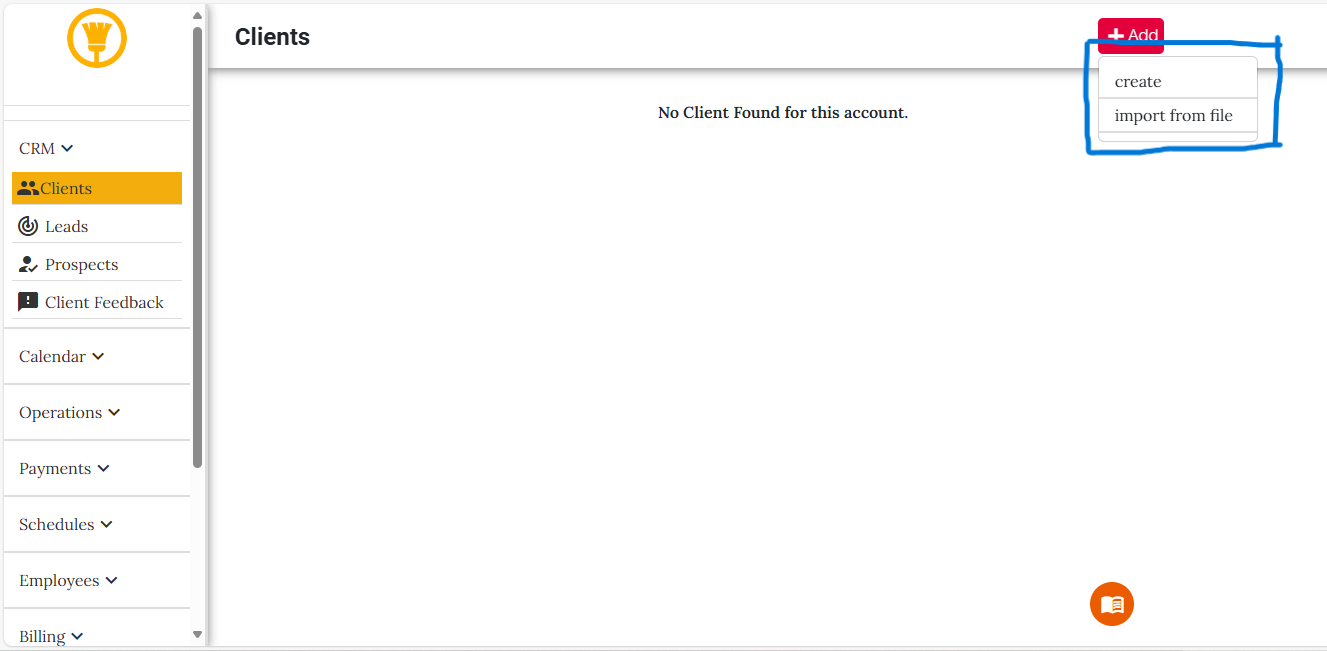
1.Create
2.Import from File
(Refer to the image above for the overlay menu.)
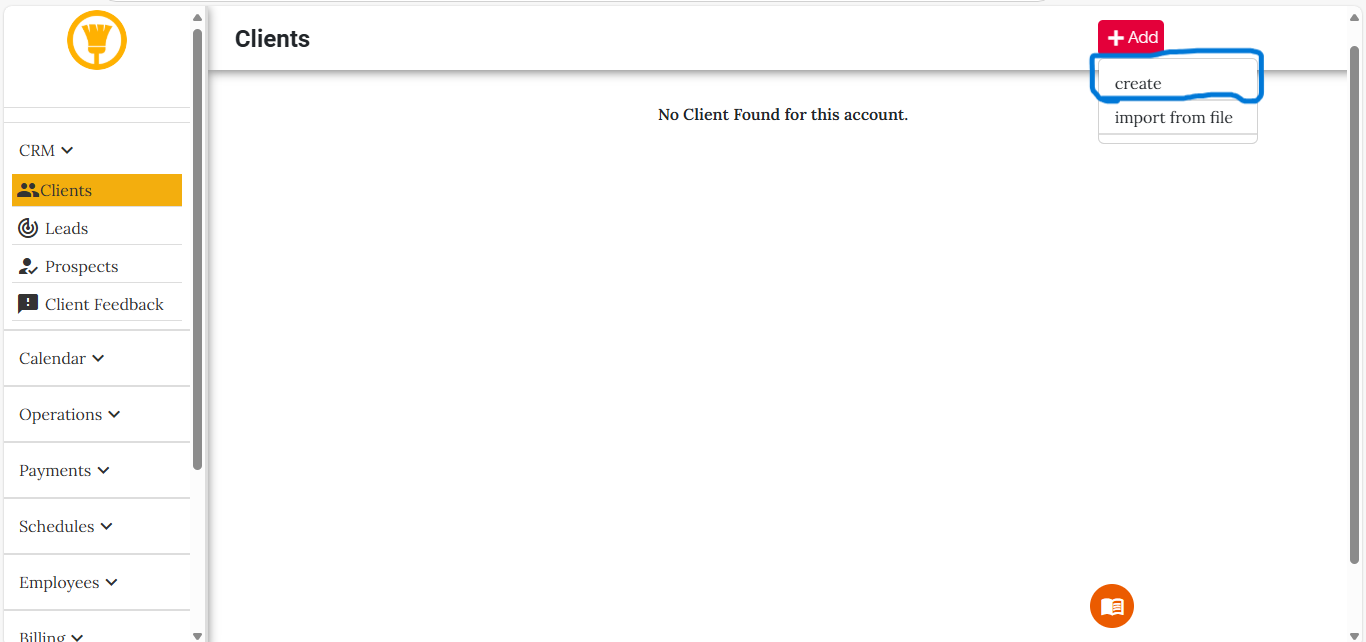
For this section, we will focus on the Create option.
Click on the create tab (refer to the image below)
Step 3: The Client Form
After you click on the Create tab, a form will appear, allowing you to enter the client's details. (Refer to the image below for the form layout.)

Step 4: Fill in the Client Details
Complete the form by providing the following details:
i. firstName
ii. lastName
iii. Email Address
iv. Phone Number
v. Address
Step 5: Save the Client
After all necessary fields are completed, click the "create" button at the bottom of the form.
And that's it! You have successfully created a client profile. (Refer to the images provided for a visual walkthrough of each step.)
Importing Customers
In this section, we will guide you on how to import clients into your Client Management Tool using a CSV file.
Step 1: Locate the Add Button
First, locate the Add button at the top of the webpage to begin the import process.
Refer to the image below to see the Add button:
Step 2: Open the Overlay Menu
Click the Add button to display an overlay menu. As explained in the previous section, the menu contains two options:
- create
- import from file
This time, click on the import from file option.
Refer to the image below for the highlighted import from file option:
Step 3: Upload the CSV File
After clicking the "import from file" option, a form will appear. This form allows you to upload your CSV file.
Refer to the image below to see the form layout:
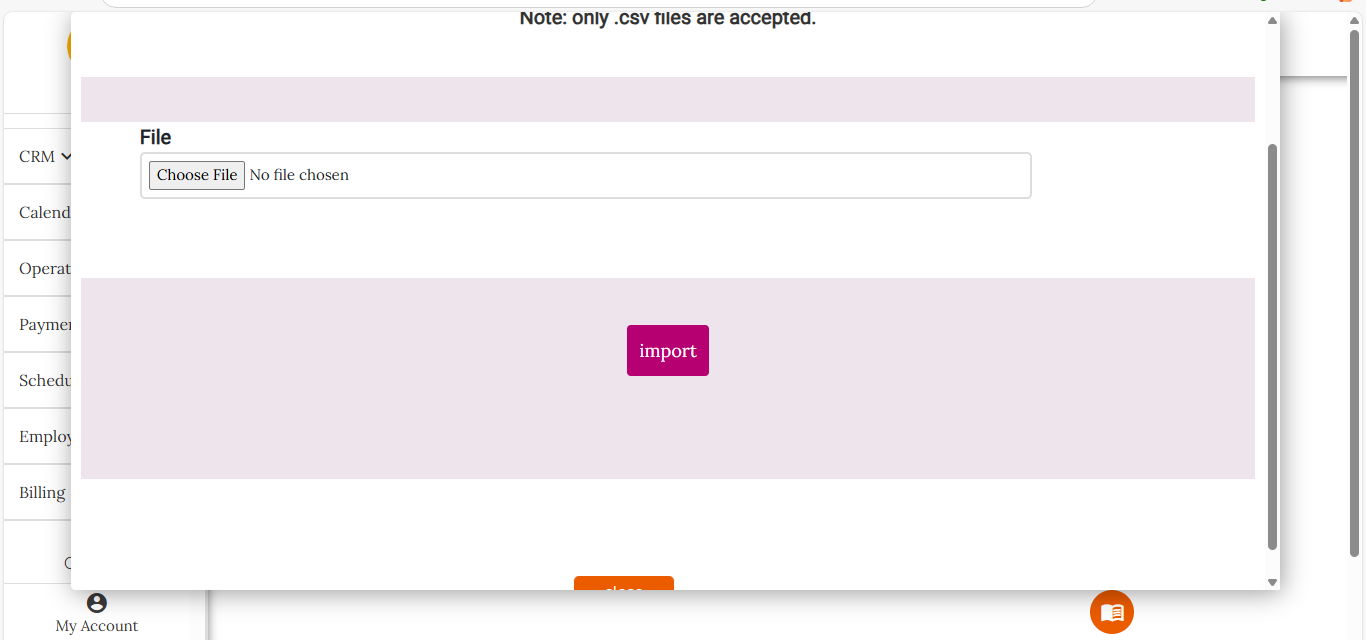
Step 4: CSV File Requirements
For a successful import, your CSV file must meet the following requirements:
- The file must have the following headers:
firstname,lastname,email,phone, andaddress. - The order of the headers does not matter, but all the headers must be included.
- Only CSV files are accepted. Any other file type will result in an error.
Ensure your file is formatted correctly before uploading it into the form.
Step 5: Import the File
Once your CSV file is ready, upload it into the form. After uploading, click on the Import button to complete the process.
And that's it! Your clients' data will be imported successfully into your CRM system.
Viewing a Client's Full Profile Details
In this section, we will guide you on how to view the full details of a client in your Client Management Tool.
Step 1: Locate the Client in the Table
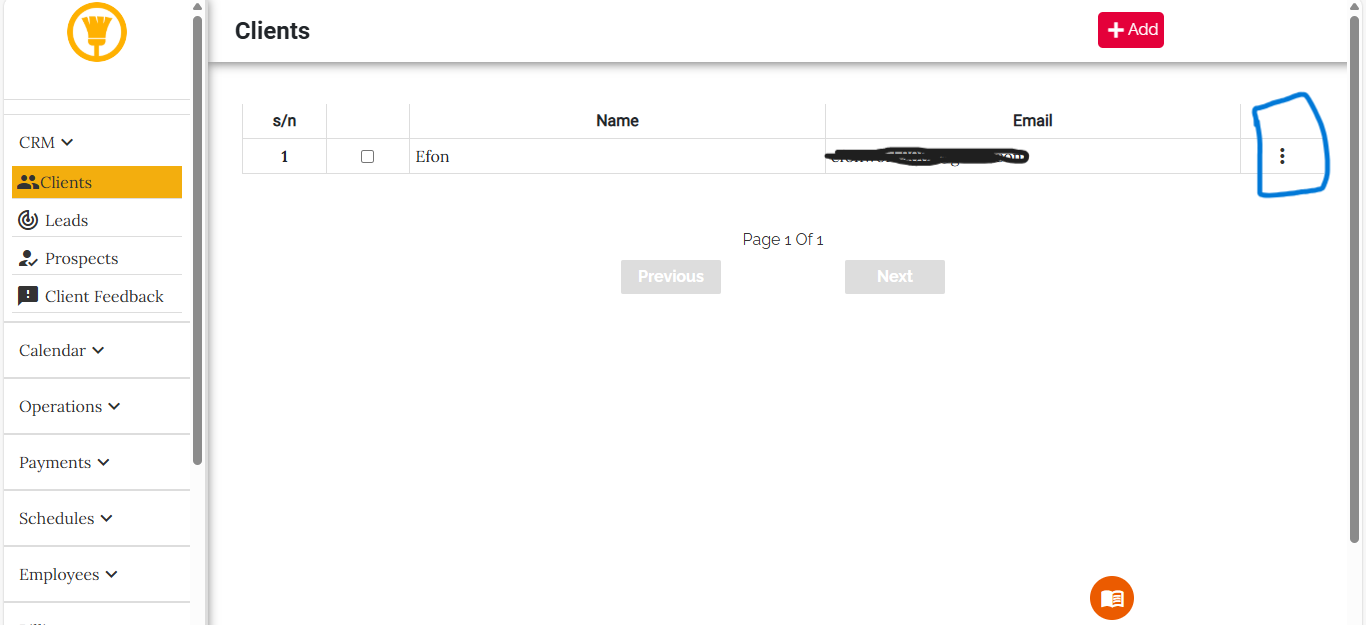
After a client is created, their information is displayed in a tabular format. To the right of each customer entry, there is a menu represented by a three-dot icon.
Refer to the image below for the location of the three-dot menu:
Step 2: Open the Options Menu
Click on the three-dot menu to open an overlay with the following options:
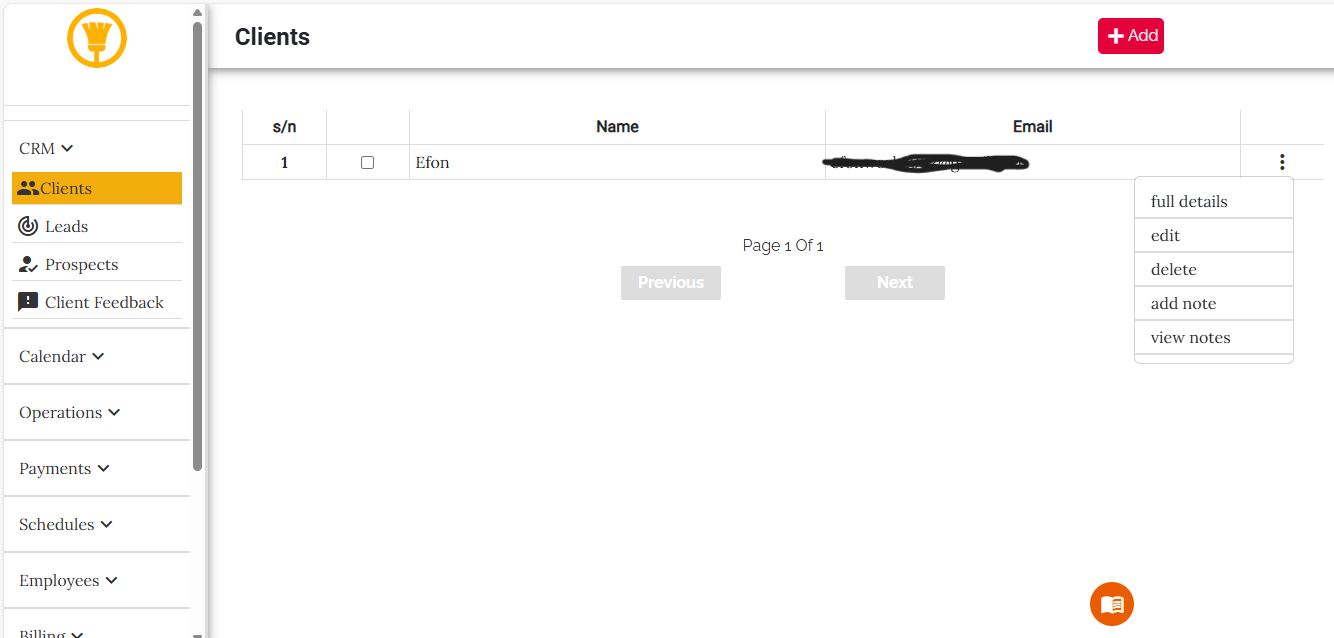
- full details
- edit
- delete
- add notes
- view notes
Step 3: click on the "full details" tab
From the overlay menu, click on the "full details" tab. This will display the client's full profile information on the screen.
Editing a Client Record
In this section, we will guide you on how to edit a client profile in your Client Management Tool.
Step 1: Locate the Client in the Table
As with viewing a client's profile details, locate the client in the tabular format. To the right of the client entry, click on the three-dot menu.
Refer to the image below for the location of the three-dot menu:
Step 2: Select "Edit"
From the options that appear in the overlay menu, click on the Edit option. This will load the client's profile details and open a form for editing.
Step 3: Edit Client Profile Details
Update the necessary fields in the form. The fields will include the same information you provided during client creation, such as:
- firstName
- lastName
- Email Address
- Phone Number
- Address
Step 4: Save Changes
Once you have made the necessary changes, click the "Update" button located below the form to save the updated details.
The client's information will now be updated in the system.
Deleting a Client
In this section, we will guide you on how to delete a client from your Client Management Tool.
Step 1: Locate the Client in the Table
As with the previous actions (viewing full details and editing), locate the client in the tabular format. To the right of the client entry, click on the three-dot menu.
Step 2: Click "delete" tab
From the options that appear in the overlay menu, click on the "delete" option. Once clicked, the client’s data will be permanently removed from the Dashboard.
Step 3: Important Note
Please note that this action is irreversible. Once a client profile is deleted, it cannot be recovered. Ensure you truly intend to delete the client profile before proceeding with this action.
Exporting Clients
In this section, we will guide you on how to export selected clients' profile from your Client Management Tool.
Step 1: Select Clients to Export
Each client entry in the table has a checkbox on the left-hand side. To begin the export process, check the box next to the client you wish to export.
Step 2: Access the Top Menu
Once one or more checkboxes are checked, a three-dot menu will appear at the top of the table header. Click on the three-dot menu to open an overlay with two options 1. "delete" and 2. "export".
Step 3: Select "export"
In the overlay menu, click on the Export option. This will trigger the export process, and the selected client's profile will be prepared for download.
Step 4: Wait for Background Processing
Once you click "export" tab, the system will process the selected client's profile in the background. This might take a few moments depending on the number of clients you selected.
Step 5: Download the CSV File
After processing, the selected clients' profile will be exported into a CSV file, which will be automatically downloaded to your browser.
Once the download is complete, you will have a CSV file containing the selected clients' data on your system, which can be opened and used in applications that support CSV files.
Deleting Multiple Clients' Profile
In this section, we will guide you on how to delete multiple clients' profile from your Client Management Tool.
Step 1: Select Clients to Delete
Each client entry in the table has a checkbox on the left-hand side. To begin the deletion process, check the box next to the client you wish to delete.
Step 2: Access the Top Menu
Once you check one or more checkboxes, a three-dot menu will appear at the top of the table header. Click on this three-dot menu to open an overlay with two options 1. "delete" and 2. "export".
Step 3: Click on the "delete" Tab
In the overlay menu, click on the "delete" option. Once clicked, all the selected clients will be permanently deleted from the system.
Step 4: Important Note
Be cautious before clicking "delete". This action is irreversible. Once the clients' profile are deleted, their data cannot be recovered. Ensure you are deleting the correct client profile before proceeding.
Step 5: Confirm Deletion
After clicking "delete", the selected clients will be automatically removed from your clients' list, and their data will no longer be available in the Dashboard.
Adding Notes To A Client Profile
In this section, we will guide you on how to add notes to a client profile in your Client Management Tool.
Step 1: Locate the Client in the Table
As with viewing a client's profile details, locate the client in the tabular format. To the right of the client entry, click on the three-dot menu.
Refer to the image below for the location of the three-dot menu:
Step 2: Select "add notes"
From the options that appear in the overlay menu, click on the "add notes" option.
Step 3: Save Note
After clicking on the "add note" tab, a form will be loaded, input the note you want to save into the form input and click on the "add note" button to save the note on this client profile.
Viewing Added Notes On A Client Profile
In this section, we will guide you on how to view added notes to a client profile in your Client Management Tool.
Step 1: Locate the Client in the Table
As with viewing a client's profile details, locate the client in the tabular format. To the right of the client entry, click on the three-dot menu.
Refer to the image below for the location of the three-dot menu:
Step 2: Select "view notes"
From the options that appear in the overlay menu, click on the "view notes" option.
All added notes on this profile can bee seen.